LiFePO₄ Batteries & Off-Grid Power Systems No grid. No backup. No bullshit.
Think building your own LiFePO₄ battery bank sounds boring? Think again. This ain’t some nerdy weekend project — it’s part science, part survival, and all badass. In this post, I walk you through how I ditched lead-acid misery and built lithium power systems that run my off-grid shop, my trailer, and half my damn lifestyle. It’s a hands-on hobby that’s fun, addictive, and actually useful when the lights go out (which they will). Whether you’re building solar backup, an RV power wall, or just sick of babying dead batteries, this guide covers real-world builds, top balancing, BMS smackdowns, and wiring that won’t fry your gear. DIY lithium power — for people who’d rather do than watch.
5/26/20253 min read

🔋 Chemistry & Key Specs
LiFePO₄ (Lithium Iron Phosphate) is a lithium-ion battery chemistry that’s built for off-grid living — rugged, stable, and cycle-hardened. If you’re running power in the wild, this is your workhorse.
Core Specs:
Nominal Voltage: 3.2V per cell
Fully Charged: 3.65V
Discharged (Safe Low): 2.5V – 2.8V
Cycle Life: 2,000–6,000+ cycles (depending on depth of discharge and thermal conditions)
Energy Density: ~90–120 Wh/kg
Operating Temp: -20°C to 60°C (ideal range: 10°C–45°C)
Stability: High — resistant to thermal runaway
⚡ Why LiFePO₄ Beats Lead-Acid and Other Chemistries
FeatureLiFePO₄Lead-AcidLi-ion (NMC/other)Cycle Life2000–6000+300–500500–1500WeightLightHeavyMediumDischarge Capability100% usable (80%)~50% usable~80–90%Thermal Runaway RiskLowNoneHighMaintenanceNoneConstantMinimalCost Over TimeLower (TCO)HighHigh
Bottom Line: You might spend more upfront, but LiFePO₄ saves your ass (and your budget) over the long haul.
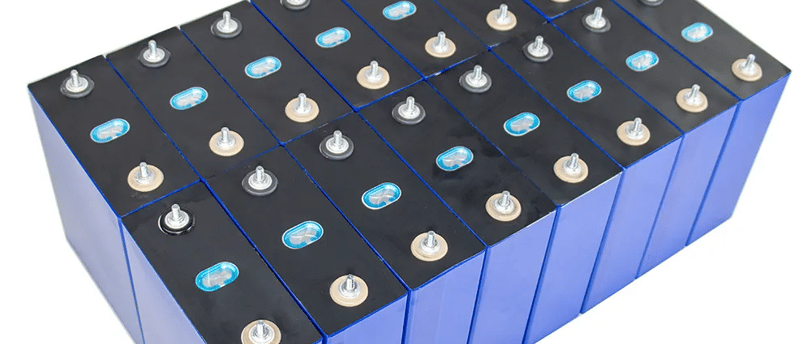
🧠 How I Built My Banks
“I got tired of babying batteries and feeding lead-acid its morning gruel. So I built my own damn banks. Here’s how.”
Each of my builds uses 3.2V 50Ah prismatic cells, grouped in 4S (12V) or 8S (24V). I sourced my cells from vendors like EVE, CATL, Luyuan, or Shenzhen Basen, and tested them for internal resistance. I used compression brackets, a JBD Smart BMS, and set the low cutoff at 2.8V and the high cutoff at 3.55V per cell for longevity.
🔍 How They Work in Off-Grid Systems
Solar Charging: MPPT controller set to 14.2V–14.6V (12V) or 28.4V–29.2V (24V)
High Current Output: Excellent for tools, inverters, and DC loads
Low Self-Discharge: Minimal voltage drop during inactivity
Smart BMS: Bluetooth-enabled BMS lets you monitor every stat in real time
🧠 Practical Tips & Warnings
DO:
Fuse or breaker your output
Balance cells before first use
Use compression on prismatic cells
Install a smart BMS
Use a shunt (e.g. Victron or Renogy)
DON'T:
Charge below freezing
Mix old and new cells
Use a lead-acid charger
Skip top balancing
📦 Where & What to Buy: Real Talk
Quality has improved drastically. Today’s Chinese cells are often top-balanced, brand new, and voltage-matched.
Platforms:
PlatformProsConsAmazonFast, trusted sellersExpensive middlemenAliExpressHuge selection, quality improvedShipping delays, costsAlibabaBulk deals, group buysMOQs, language barriersTimuRecommended — Canadian warehouses, fastSome new/inconsistent sellers
What to Buy:
100Ah cells are the sweet spot:
Affordable
Common = consistent
Easier to configure
Better price-to-performance than 280Ah/320Ah monsters
“Build your own. Test it. Improve it. Don’t buy someone else’s overpriced box.”
🔌 Wiring, Balancing & Not Screwing It Up
▶ Series Wiring
Positive to Negative in a chain
Voltage adds up
Amps stay the same
4S (12.8V @ 100Ah)
▶ Parallel Wiring
Positive to Positive, Negative to Negative
Amps add up
Voltage stays the same
1S4P (3.2V @ 400Ah)
▶ Series-Parallel Wiring
2 series pairs paralleled = 2S2P (6.4V @ 200Ah)
Label your strings — unbalanced parallels will ruin your day.
🌟 Top Balancing 101
Even new cells need a balance.
How to Top Balance:
Parallel all cells (positive to positive)
Charge with a bench supply @ 3.65V, ~5A
Wait until every cell reaches 3.65V
Double-check voltages (within 0.01V)
Wire into final configuration
Use multiple power supplies to speed things up.
🔧 BMS: The Brain & The Bouncer
“The BMS is your battery’s brain and bouncer. It’ll cut off overvoltage, undervoltage, overheating, and short circuits faster than you can say ‘oops.’”
Why You Need One:
Monitors cell voltages
Protects from over/undercharge
Controls temps
Cuts off short circuits
Installation Basics:
Wire balance leads from lowest (B-) to highest
Connect B- to battery negative
Connect P- to system/load ground
Connect C- (if separate) to charger ground
Best BMS Tools & Apps:
Xiaoxiang App (JBD)
Daly Smart App
JK App (for active balancing units)
Recommended Settings:
OVP: 3.55V/cell
UVP: 2.8V/cell
Charge Temp: 5°C–45°C
Discharge Temp: -10°C–60°C
Balance Start: 3.45V
Passive vs Active Balancing:
Passive: Common, cheap, slower
Active: Fast, efficient, expensive
Passive = good enough for 12V tools Active = better for big 24V/48V systems
BMS Freak-Out Mode:
If your BMS beeps or cuts power:
Check voltages
Check temps
Use the app to read fault
Fix root cause before resetting
“The BMS isn’t your enemy — it’s saving your system from you.”
Stay tuned for the next post: full wiring diagrams, BMS walk-throughs, and how to turn this into a mobile power lab.